Tech Media TM-EX68 HDMI Extender Support 4K 30Hz
| หมวดหมู่ | Tech Media |
| ราคา | 0.00 บาท |
| สถานะสินค้า | พร้อมส่ง |
| ลงสินค้า | 15 พ.ค. 2563 |
| อัพเดทล่าสุด | 1 มิ.ย. 2563 |
| จำนวน | ชิ้น |
หยิบลงตะกร้า

Tags : HDMI EXTENDER Support 4K 30Hz, HDMI EXTENDER, อุปกรณ์ขยายสัญญาณ HDMI, ต่อ HDMI ให้ไกลขึ้น, EXTENDER SE EX68, TM-EX68, TM-EX68 HDMI Extender, EXTENDER TM EX68, TM-EX68 ราคา, HDMI EXTENDER TM-EX68
รายละเอียดสินค้า
30M HDMI Extender over 60GHz WIRELESS Support 4K@30Hz YUV 4:4:4 8Bit
Features
- 60Ghz wireless extender
- Support the highest Resolution up to 4K@30Hz YUV 4:4:4 8bit
- Support the longest transmission distance to 10M wireless under 4K30HZ, 30m under 1080P@60Hz with certain conditions, like open space/horizontal height of equipment, etc
- Support HDCP1.4,compatible with HDCP2.2 Blu-Ray player, follow the output HDCP. But there will be no image if the sink is decrypted.
- Support 100-230V voltage input, DC5V power supply
- Support Many to one(7 TX max to 1 RX), One to many(1 TX to 2 RX max)
- Reset and pairing button for both TX and RX
- No Latency
SPECIFICATIONS
|
Operating Temperature Range |
0 to +40℃(+32 to +104℉) |
|
Operating Humidity Range |
10 to 90%RH (No Condensation) |
|
Connectors on Transmitter |
HDMI Receptacle x 1 Power USB x 1 |
|
Connectors on Receiver |
HDMI Receptacle x 1 Power USB x 1 |
|
HDMI input/output port |
HDMI Type A 19-pin |
|
HDMI Version |
HDMI1.4/HDCP1.4 |
|
Resolution outputs |
4k@30hz/1080p//720p/480p |
|
Frequency |
60GHz |
|
Frequency width |
100MHz |
|
RF power |
10dBm MAX |
|
Antenna |
Matrix style Antenna |
|
Audio format supported |
PCM 2.0,Dolby True HD,DTS-HD master audio |
|
Latency |
< 3ms |
|
Power supply |
DC 5V 1A Power supply |
|
Power consumption |
3.5W(MAX) |
|
Transmission Distance |
10m under 4K@30Hz, 30m under 1080P@60Hz |
|
Dimension (L×W×H) |
TX: L80xW68xH16.5mm; RX: L80xW68xH16.5mm |
|
Net Weight |
TX: 55g; RX:55g |
Package Contents
- 1xHDMI Transmitter
- 1xHDMI Receiver
- 2xUSB Cable
- 2x5V DC Adapter
- 2xAdjustable bracket
- 1xUser Manual
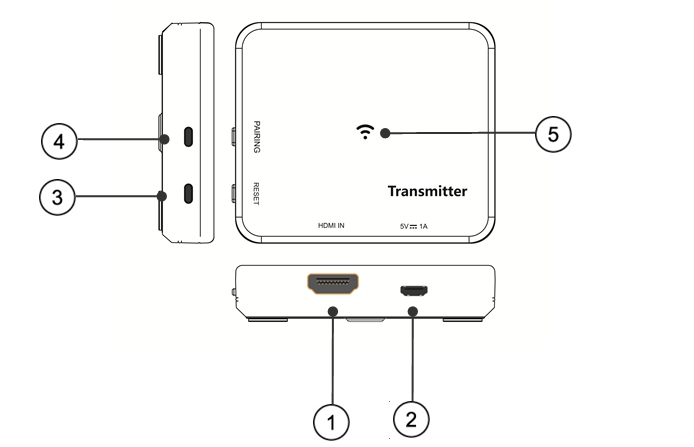
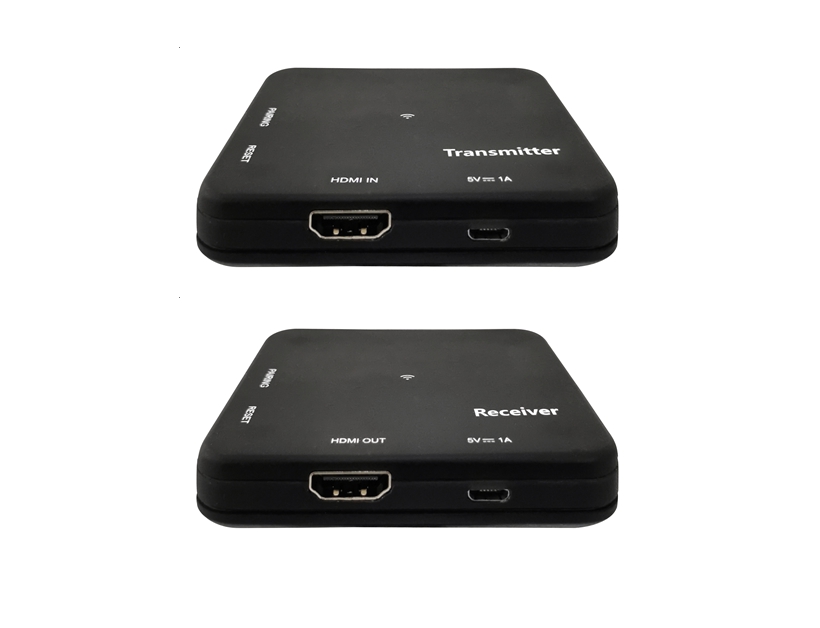
PANEL DESCRIPTIONS
Transmitter Panel
① HDMI input port ② DC 5V port
③ Reset button ④ Pairing button
⑤ Signal indicator
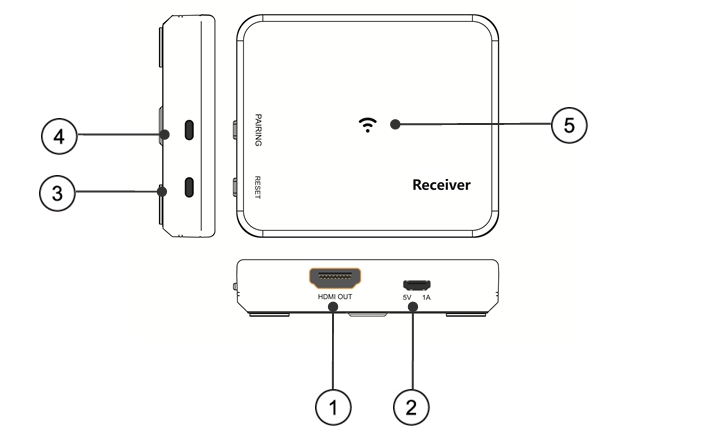
Receiver Panel
① HDMI input port ② DC 5V port
③ Reset button ④ Pairing button
⑤ Signal indicator
MAIL-IN SERVICE
When shipping the unit carefully pack and send it prepaid, adequately insured and preferably in the original carton. Include a letter detailing the complaint and provide a day time phone and/or email address where you can be reached.
LIMITED WARRANTY LIMITS AND EXCLUSIONS
1) This Limited Warranty ONLY COVERS failures due to defects in materials or workmanship, and DOES NOT COVER normal wear and tear or cosmetic damage.
The Limited Warranty ALSO DOES NOT COVER damages which occurred in shipment, or failures which are caused by products not supplied by warrantor, or failures which result from accidents, misuse, abuse, neglect, mishandling, misapplication, alteration, faulty installation, set-up adjustments, misadjustment of consumer controls, improper maintenance, power line surge, lightning damage, modification, or service by anyone other than a Factory Service center or other Authorized Servicer, or damage that is attributable to acts of God.
2) THERE ARE NO EXPRESS WARRANTIES EXCEPT AS LISTED UNDER "LIMITED WARRANTY COVERAGE". THE WARRANTOR IS NOT LIABLE FOR INCIDENTAL OR CONSEQUENTIAL DAMAGES RESULTING FROM THE USE OF THIS PRODUCT, OR ARISING OUT OF ANY BREACH OF THIS WARRNTY. (As examples, this excludes damages for lost time, cost of having someone remove or re-install an installed unit if applicable, travel to and from the service, loss of or damage to media or images, data or other recorded content. The items listed are not exclusive, but are for illustration only.)
3) PARTS AND SERVICE, WHICH ARE NOT COVERED BY THIS LIMITED WARRANTY, ARE YOUR RESPONSIBILITY.
MAINTENANCE
Clean this unit with a soft, dry cloth. Never use alcohol, paint thinner of benzine to clean this unit.
PRODUCT SERVICE
1) Damage requiring service:
The unit should be serviced by qualified service personnel if:
(a) The DC power supply cord or AC adaptor has been damaged;
(b) Objects or liquids have gotten into the unit;
(c) The unit has been exposed to rain;
(d) The unit does not operate normally or exhibits a marked change in performance;
(e) The unit has been dropped or the cabinet damaged.
2) Servicing Personnel: Do not attempt to service the unit beyond that described in
these operating instructions. Refer all other servicing to authorized servicing personnel.
3) Replacement parts: When parts need replacing ensure the servicer uses parts
specified by the manufacturer or parts that have the same characteristics as the
original parts. Unauthorized substitutes may result in fire, electric shock, or other hazards.
4) Safety check: After repairs or service, ask the servicer to perform safety checks
to confirm that the unit is in proper working condition.
WARRANTY
If your product does not work properly because of a defect in materials or workmanship, our Company (referred to as "the warrantor" ) will, for the length of the period indicated as below, (Parts(2)Year, Labor(90) Days) which starts with the date of original purchase ("Limited Warranty period"), at its option either(a) repair your product with new or refurbished parts, or (b) replace it with a new of a refurbished product. The decision to repair or replace will be made by the warrantor.
During the "Labor" Limited Warranty period there will be no charge for labor.
During the "Parts" warranty period, there will be no charge for parts. You must mail-in your product during the warranty period. This Limited Warranty is extended only to the original purchaser and only covers product purchased as new. A purchase receipt or other proof of original purchase date is required for Limited Warranty service.
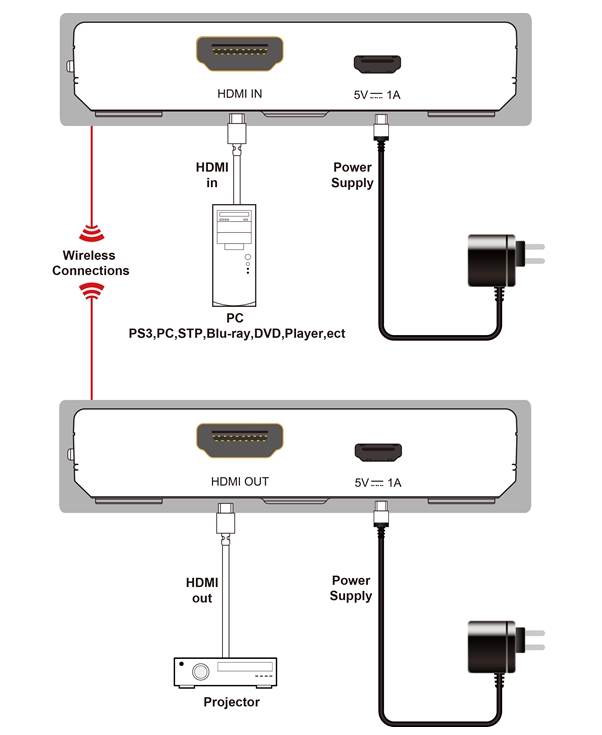
Connecting and operating
1. Connect 1 source such as a Blu-Ray Player, game console, STB, etc. to the HDMI input on the transmitter
2. Connect 1 display such as an HDTV or HD Projector to the HDMI output on the receiver .
3. Power on the transmitter and receiver,pairing TX and RX first, then start working.
Connection Diagram
Installation instructions
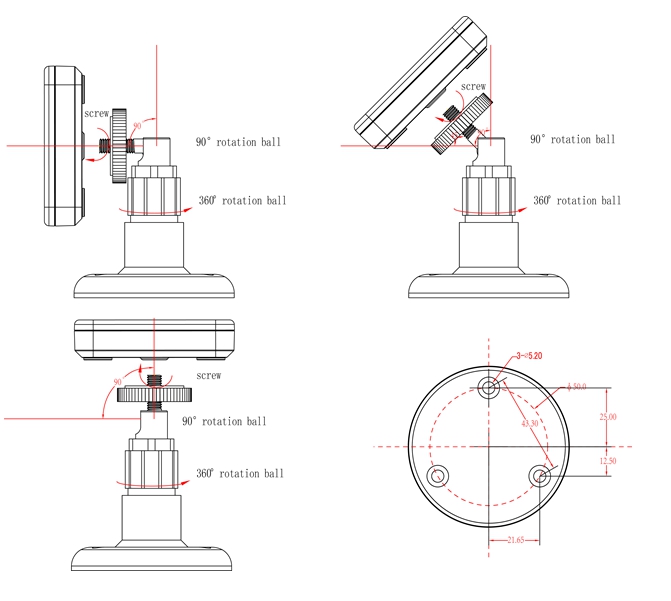
1.Screw up the adjustable bracket to TX and RX back side hole.
2.Adjust the TX and RX position within 0°-90°by rotating the 90° rotation ball.
3.Loosen 360° rotation ball, then able to adjust TX and RX position within 0°-360°
4.TX and RX can be fixed on the wall with 3 mounting holes on the bottom of the adjustable bracket
Remark: Adjust TX and RX to 45° position when in the complex environment with barrier, it will increase the signal reception.
Adjust TX and RX to 90° position when in open space without barrier,transmission distance will be longer and signal will be more stable
LED status indicator and button instruction
1. The device includes one LED status indicator: yellow data transmission indicator
The indicator always on when data transmission stable through WIFI;Otherwise, the indicator will flickering.
2. Reset button: when power on, long press the reset button 5S to reset the device.
3. Pairing button:long press the pairing button on both TX and RX simultaneously(about 6S) until the data transmission indicator(located in the middle of the panel) goes out.
under one to many or many to one application, able to switch between input and output by short press pairing button.
NOTED:
Under one to many mode, when one channel output signal is weak,it will be automatically switched to the one channel output with strong signal.
วิธีการชำระเงิน
ชำระเงินผ่านธนาคาร


 99 A PLUS GROUP CO.,LTD
สมัครสมาชิกร้านนี้ เพื่อรับสิทธิพิเศษ


ต้องการสอบถามข้อมูลสินค้าเพิ่มเติม ติดต่อได้ที่เบอร์
099-562-3263 ติดต่อ คุณธนกร
091-546-2666,092-691-9555 ติดต่อ คุณพิพัฒน์
ยินดีให้บริการกับลูกค้าทุกท่านครับ
▲
▼
รายการสั่งซื้อของฉัน
รายการสั่งซื้อของฉัน
ข้อมูลร้านค้านี้

99 A PLUS GROUP CO.,LTD
บริษัท 99 เอ พลัส กรุ๊ป จำกัด เป็นตัวแทนจำหน่ายอย่างเป็นทางการของบริษัท โซนี่ ไทย จำกัด (Sony) ดำเนินธุรกิจในการจำหน่ายและบริการสินค้า ตลอดจนให้คำปรึกษาเกี่ยวกับผลิตภัณฑ์ประเภท Broadcast & Professional อาทิเช่น กล้องถ่ายวิดีโอสำหรับมืออาชีพ , เครื่องฉายภาพมัลติมีเดียโปรเจคเตอร์ , ระบบชุดประชุม Video Conference , ระบบรักษาความปลอดภัย กล้อง CCTV , ม้วนเทปบันทึกภาพและเสียง รวมไปถึงชุดอุปกรณ์เสริมต่างๆ อีกมากมาย จำหน่ายกล้องถ่ายวีดีโอแบบมืออาชีพ ( Professional Camera ) ยี่ห้อ SONY format XDCAM จำหน่าย ขาย กล้องวิดีโอ ระดับมืออาชีพ พร้อมอุปกรณ์สตูดิโอทุกรูปแบบ สำหรับงานถ่ายทำความละเอียดระดับ Full HD, UHD, 4K มีจำหน่ายทั้งยี่ห้อ Sony และ Panasonic บริษัท 99aplus Group จำหน่าย กล้องวิดีโอแบบ XDCAM กล้องวิดีโอแบบ AVCHD ทั้ง SONY และ PANASONIC พร้อมทั้งรับออกแบบระบบสตูดิโอและระบบสตรีมมิ่งมี SOLUTION ให้ท่านเลือกมากมาย ตัวอย่างกล้องวีดีโอ PXW-FS7,PXW-FS5,AG-UX90,AG-UX180,HC-PV100,NX5R
เบอร์โทร : 099-562-3263
อีเมล : Contact@99aplus.co.th
อีเมล : Contact@99aplus.co.th
ส่งข้อความติดต่อร้าน
เกี่ยวกับร้านค้านี้
ค้นหาสินค้าในร้านนี้
ค้นหาสินค้า
สินค้าที่ดูล่าสุด
บันทึกเป็นร้านโปรด
Join เป็นสมาชิกร้าน
แชร์หน้านี้
แชร์หน้านี้
↑
TOP เลื่อนขึ้นบนสุด
TOP เลื่อนขึ้นบนสุด
สินค้าในตะกร้า ({{total_num}} รายการ)

ขออภัย ขณะนี้ยังไม่มีสินค้าในตะกร้า
ราคาสินค้าทั้งหมด
฿ {{price_format(total_price)}}
- ฿ {{price_format(discount.price)}}
ราคาสินค้าทั้งหมด
{{total_quantity}} ชิ้น
฿ {{price_format(after_product_price)}}
ราคาไม่รวมค่าจัดส่ง
➜ เลือกซื้อสินค้าเพิ่ม